Author Topic: Review and pics: powered subwoofer  (Read 10751 times)

Offline rich weyand

  • Senior Member
  • ****
  • Posts: 1391
Review and pics: powered subwoofer
« on: November 18, 2013, 02:59:53 PM »
I installed a subwoofer in my 1978 K-10 rcsb, and that has worked out really well.  I have a Highliner headliner that I put four Kicker DS400 coaxial speakers in, and they do a really nice job except in the bottom couple of octaves.  So I wanted something to stiffen up the bottom.  Not a lot of room in an oobs rc, so here's some info on what I did.

I bought the Lanzar Vector VCTSB, which is a 600W (peak), 150W (rms) powered subwoofer.  It is less than three inches thick, and about the size of a legal sheet of paper (8-1/2" x  14") more or less.  They way they get it so thin is that the 8" woofer does not have a cone, it has a plate.  That is, the driver is not concave at all, it is completely flat.  Basically, you get the unit, plus you also get a "bass boost" knob on a telephone cord that allows you to turn the bass up or down without fiddling with the unit.

I mounted the unit just in front of the back wall of the cab.  I mounted it on two 1" x 1/4" aluminum bars with #10-24 stainless steel pan-head machine screws, and I mounted the bars to the truck with #10 stanless steel A-point heax head sheet metal screws.  I mounted the bars to the truck at the floor and into the reinforcing channel under the window rather than to the rear cab wall, because I don't like the idea of running screws through the rear wall of the cab, the metal isn't that thick, and the rear wall of the cab would, I expect, drum and piston like mad with this thing on there.

I mounted the unit "upside-down" in that the logo on the unit is upside-down in my preferred mounting.  This puts the speaker itself higher in the cab, and puts the controls on top and the wire entries on the bottom.  The unit has a pilot LED, a fault LED, a phase switch, a level adjust, a "bass-boost" level adjust, and a frequncy cut-off adjust on the "top".  On the "bottom" are the RCA line level inputs, some speaker level inputs, and the supply, ground, and head-unit wires.  The head-unit wire is a wire that tells the subwoofer amp that the radio is on so the subwoofer turns on, since it is not routed through the ignition.

Now, some background.  I'm 57 years old.  My test albums are Dark Side of the Moon, which came out when I was a senior in high school, and Led Zeppelin IV.  I am not a boomity-boom kind of guy, I am a "flat frequency response across the band" kind of guy.  I've been big into stereo equipment for almost 40 years, and have always had nice equipment.  Let's just say I'm pretty serious about audio.

So the Kicker DS400s left a lot to be desired in the bass end.  Not a slam, they're 4" speakers.  The Lanzar Vector fills in the bottom quite nicely.  My digitally mastered Dark Side of the Moon test album is quite a test for the bottom end and I have no complaints.  Now, if you're a boomity-boom kind of guy, I only have the level adjust on the Lanzar up halfway, and the "bass boost" control turned all the way down.  If you want to play hip-hop and rattle the sheet metal, I think this will do just fine.  The unit looks solid and well-built, and it fired up right off, no drama, and all the controls work as you would expect.  No surprises.

The biggest thing is that it fits.  It's made to go under car seats, and it fits on the rear cab wall behind my jump seat without any problem. With the stock seat you might need to put the unit horizontally to get it to fit.  You could probably put three of these across the rear cab wall behind the seat if you wanted, but make sure all your welds and sheet-metal fasteners are tight.

Installation is straight forward.  You need an 8AWG wire from the battery for the supply, which is kind of a pain, but that's the only way to keep out noise from other things sharing a common supply wire turning on and off.  You don't want it thumping every time the A/C kicks on, or every time you dim the headlights, or whatever.  I ran the supply wire along the stock looming, along the radiator upper cross member, along the inner fender to the firewall, and through the grommet with the speedometer cable.  I then went across inside the dash, picking up the audio cables and the head unit power wire, down to the center of the transmission tunnel and back alongside the transfer case shifter under the carpeting to the subwoofer location.

This is a complete list of what you need to do it the way I did, with sources:

Lanzar Vector VCTSB8: http://www.amazon.com/Lanzar-VCTBS8-Super-Slim-High-Power-Subwoofer/dp/B001RJMN5S

20' of #8 AWG supply wire: http://www.bestbuy.com/site/EFX+-+20'+Marine+Power+Wire+-+Red/1074805.p?id=1218217726763&skuId=1074805&st=8 AWG wire&cp=2&lp=43

A battery stud if you have side-mount terminals: http://www.oreillyauto.com/site/c/detail/OSS0/01391.oap?tc=1&pt=N0365&ppt=C0005

A fuse holder, 8AWG: http://www.amazon.com/MAXI-Fuse-Holder-Waterproof-Cover/dp/B00030CPOQ

An 8 AWG splice kit: http://www.amazon.com/Butt-Splice-Kit-2-8-AWG/dp/B001AWP7OG

An 8 AWG crimp ring connector: http://www.bestbuy.com/site/Fierce+Audio+-+8+AWG+Seamed+Crimp-Style+Ring+Terminal+(4-Pack)+-+Black/9855579.p?id=1218186610428&skuId=9855579

Four-foot length of 1" x 1/4" aluminum bar: http://www.lowes.com/pd_216059-37672-11306_0__?productId=3053645&Ntt=aluminum&Ns=p_product_price|0&pl=1&currentURL=%2Fpl__0__s%3FNs%3Dp_product_price%7C0%26Ntt%3Daluminum%26page%3D11

Six #10-24 machine screws: http://www.lowes.com/pd_136341-37672-881958_0__?productId=3012272&Ntt=stainless+steel+machine+screws&Ns=p_product_price|0&pl=1&currentURL=%2Fpl__0__s%3FNs%3Dp_product_price%7C0%26Ntt%3Dstainless%2Bsteel%2Bmachine%2Bscrews

Ten #10 washers: http://www.lowes.com/pd_117766-37672-882479_0__?productId=3050081&Ntt=stainless+steel+washers&pl=1&currentURL=%2Fpl__0__s%3FNtt%3Dstainless%2Bsteel%2Bwashers

Four #10 sheet metal screws: http://www.lowes.com/pd_113887-37672-823084_4294859052+4294866561+5003696_?productId=3009217

Four corner braces: http://www.lowes.com/pd_315714-1277-DPB115_0__?productId=3169855&Ntt=corner+braces&pl=1&currentURL=%2Fpl__0__s%3FNtt%3Dcorner%2Bbraces

About a foot of #12 AWG stranded wire for the ground connections: http://www.oreillyauto.com/site/c/detail/DOR4/85710.oap?keyword=wire&pt=N1278&ppt=C0335

A couple of #12 AWG crimp-style ring connectors for the ground connections: http://www.oreillyauto.com/site/c/detail/DOR4/84133.oap?keyword=ring+connectors

Enough 16 AWG wire to get back to your head unit: http://www.oreillyauto.com/site/c/detail/DOR4/85728.oap?keyword=wire&pt=N1279&ppt=C0335

Eight foot audio RCA cable (six feet isn't enough, and 12' is too much if the head unit is in the standard dash location): http://www.bestbuy.com/site/Rocketfish%26%23153%3B+-+8'+Stereo+Audio+RCA+Cable/9807316.p?id=1218177169975&skuId=9807316&st=rca cable&cp=1&lp=5

Some looming tube and cable ties and the like.  Also, a #10-24 tap and tap wrench to tap the holes in the aluminum bar.  I used a #25 (0.149") tap dril for 75% thread depth and Lubriplate as a tapping lubricant.

Now for the pictures:

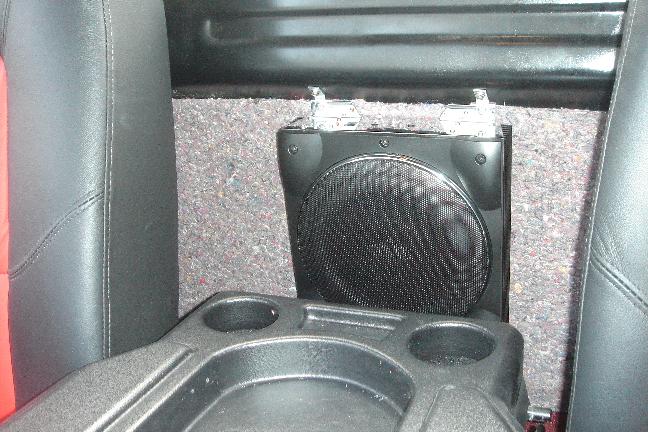
The unit installed.  The upper angle brackets were forced open from 90 degrees to about 45 degrees to match the angle of the stiffener channel under the window.


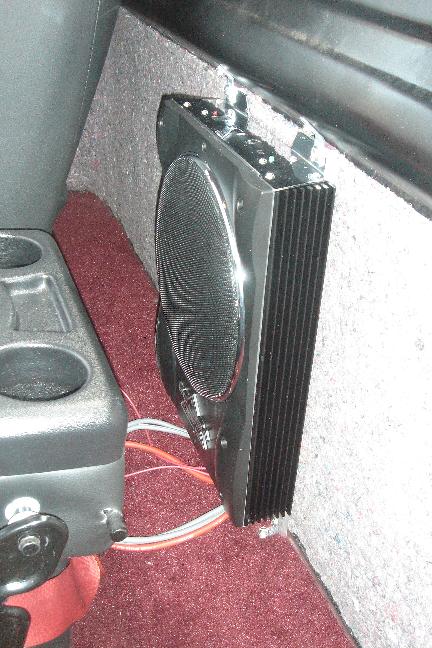
Side view with the driver's seat all the way forward.


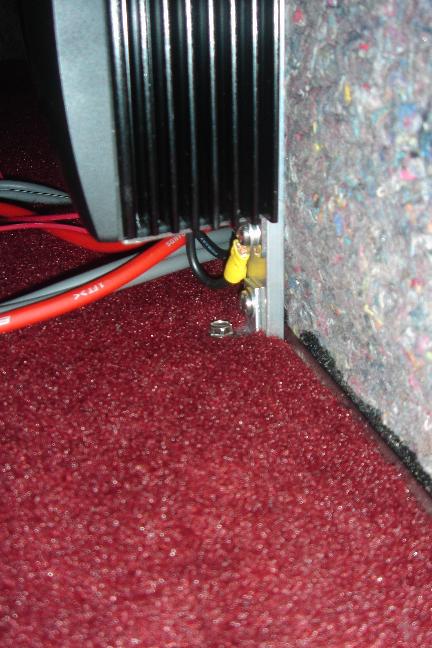
Detail of the lower mounting bracket.  The ground connection with the yellow crimp ring connector is repeated on both mounting screws.  The unit is two inches off the floor, which puts the upper mounting holes in the right place to share the screws with the upper angle brackets.


Anti-theft feature:  Now you see it ...
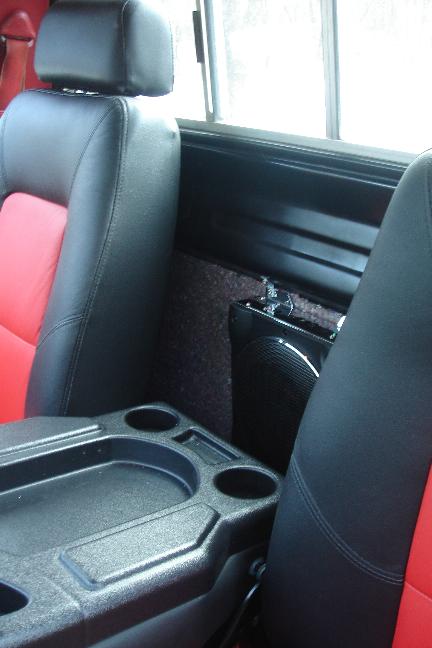


... now you don't.


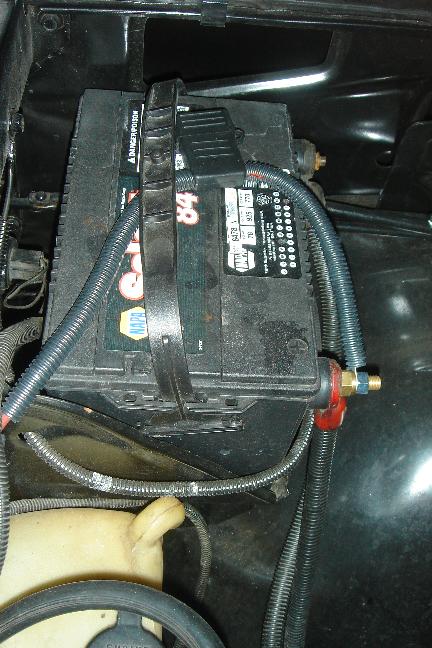
The battery connection.  I used a 20A Maxi-Fuse.  The splice between the fuse lead and the supply wire running all the way back to the unit is in the split-tubing.


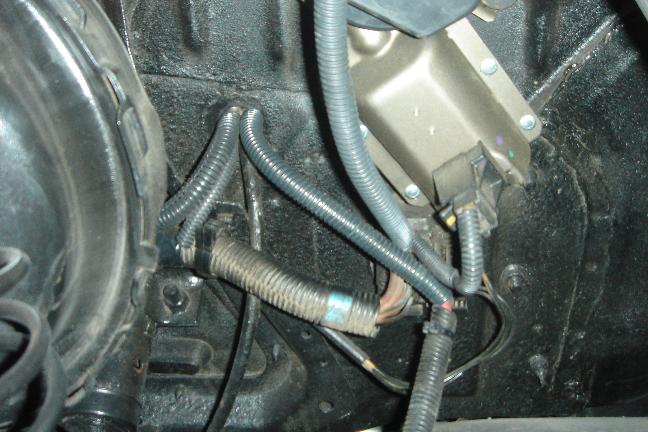
The supply wire jumps from the factory wiring to the speedometer cable hole across the center of this picture.


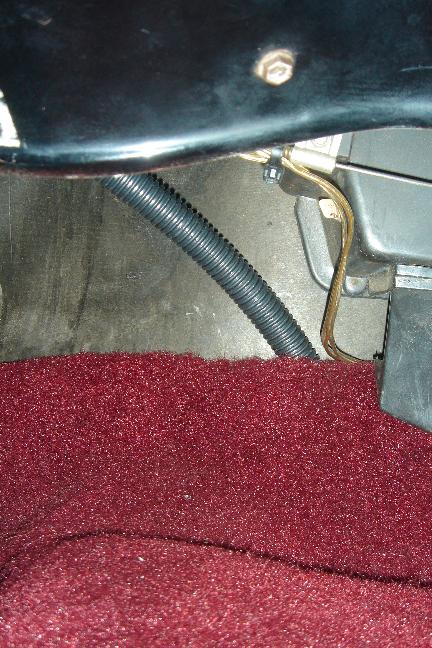
I didn't loom all the way acorss under the dash, but I did use 8-10 inches of split-tubing from just under the carpeting to under the dash to dress it up.  This is in the center of the transmission hump at the firewall.

Rich

"Working Girl": 1978 K-10 RCSB 350/TH350/NP203 +2/+3 Tuff Country lift

Offline nlauffer

  • Frequent Member
  • **
  • Posts: 274
Re: Review and pics: powered subwoofer
« Reply #1 on: November 18, 2013, 03:55:33 PM »
This is great.  I love the posts that are detailed, even when the task seems so minor and easy.  I have been debating what powered sub to use when I put my pickup back together.  I don't think I going with the Highliner, but I like the idea.

Offline rich weyand

  • Senior Member
  • ****
  • Posts: 1391
Re: Review and pics: powered subwoofer
« Reply #2 on: November 18, 2013, 04:30:07 PM »
Well, the sub is a different deal than the Highliner headliner.  BTW, the speakers that come with the Highliner headliner suck, but the Kicker DS400s fit perfectly.
Rich

"Working Girl": 1978 K-10 RCSB 350/TH350/NP203 +2/+3 Tuff Country lift

Offline nlauffer

  • Frequent Member
  • **
  • Posts: 274
Re: Review and pics: powered subwoofer
« Reply #3 on: November 18, 2013, 04:58:34 PM »
That was gonna be my next question, is what you did with the Highliner speakers.

Offline frotosride

  • Senior Member
  • ****
  • Posts: 1428
    • WFO CONCEPTS
Re: Review and pics: powered subwoofer
« Reply #4 on: November 18, 2013, 08:32:34 PM »
I've got the factory headliner but have been planning on the highliner when I actually get around to doing the interior. Other than tha obvious junk speakers come with it how is the quality of the liner as well as fitment? You satisfied with it?
"Beat it like a red-headed ford"
1987 v10 Silverado(LQ4), 87 R10,83 K20, 83 cucv 6.2 Detroit
2006 Boulevard M109R 109 cid,2019 M109R BOSS
2009 Jeep XK, (future LS Swap)
GSXR 750 engine awaiting go kart

Offline nlauffer

  • Frequent Member
  • **
  • Posts: 274
Re: Review and pics: powered subwoofer
« Reply #5 on: November 18, 2013, 09:29:48 PM »
I have been thinking about posting small, but very specific project posts lately.  Just like you have done.  As I go through my pickup, I have been working on one thing at a time.  The problem is, I have a hard time stopping and taking pictures.  I also wasn't sure if anyone would like it as much as me.  For instance, I just pulled motor mounts and motor mount plates.  I sandblasted and painted them.  I purchased new 1.25" long, 3/8 coarse thread, grade 8 bolts and locknuts.  I also bought the same bolts for the swaybar mounts.  What I was thinking about is trying to come up with a location for all of the bolt sizes and types of bolts on these vehicles.  I know this could be very time consuming, but it could definitely help me on occasion. 

If you have anymore of these detailed small projects, I would love to see them.

Offline rich weyand

  • Senior Member
  • ****
  • Posts: 1391
Re: Review and pics: powered subwoofer
« Reply #6 on: November 18, 2013, 09:31:25 PM »
That was gonna be my next question, is what you did with the Highliner speakers.

I removed them with extreme prejudice.  I actually did it without removing the headliner, which was in the truck when I got it.  Since the Kickers go on from the front, I didn't need to get to the back to put them in, I just had to get the other ones out.  I cut the surrounds and coil wires and pulled the cones and coils out.  Then I cut through the sheet metal frames and "wound them up" like you would a coiled spring to reduce their diameter, and pulled them out.  I used GM spring nut clips over the mounting holes of the headliner for mounting the Kickers. 

I've got the factory headliner but have been planning on the highliner when I actually get around to doing the interior. Other than tha obvious junk speakers come with it how is the quality of the liner as well as fitment? You satisfied with it?

Yeah, I like it a lot.  Now, I didn't put it in, it was in there when I bought the truck, but it seems to fit just fine.  Does not rattle or piston or anything like that, and it looks really good, like it was stock and not aftermarket.  It has a location for the head unit if you want it up on the ceiling.  I didn't, but it's a big enough location to fit a 1-DIN euro box into.  The speakers end up above your head on either side.  The listening experience is sort of like headphones, except they don't cover your ears so they aren't illegal.  Much less power needed, which means less distortion, when they are that close to your ears.  I put the left set on Front and the right set on Rear, and when I am alone in the truck I have the fader control set all the way to Front.  Obviously the stereo separation and imaging is great when you have a speaker equidistant on each side of your head. 

Much preferred to cutting up your doors or kick panels and putting in speakers for your butt or your feet.
Rich

"Working Girl": 1978 K-10 RCSB 350/TH350/NP203 +2/+3 Tuff Country lift

Offline rich weyand

  • Senior Member
  • ****
  • Posts: 1391
Re: Review and pics: powered subwoofer
« Reply #7 on: November 18, 2013, 09:37:08 PM »
I have been thinking about posting small, but very specific project posts lately.  Just like you have done.  As I go through my pickup, I have been working on one thing at a time.  The problem is, I have a hard time stopping and taking pictures.  I also wasn't sure if anyone would like it as much as me.  For instance, I just pulled motor mounts and motor mount plates.  I sandblasted and painted them.  I purchased new 1.25" long, 3/8 coarse thread, grade 8 bolts and locknuts.  I also bought the same bolts for the swaybar mounts.  What I was thinking about is trying to come up with a location for all of the bolt sizes and types of bolts on these vehicles.  I know this could be very time consuming, but it could definitely help me on occasion. 

If you have anymore of these detailed small projects, I would love to see them.

You didn't think people would like looking at pictures of our trucks?  Really?  I carry my smartphone on my belt, so I just pop a pic or two as I go along, though I do get into it enough that I forget.  Lots of the pictures are after the fact.

The GM parts book lists most of the hardware sizes in the detail drawings (exploded drawings) already.  I got it on a couple CDs from some outfit.  Detroit Iron or something like that.
Rich

"Working Girl": 1978 K-10 RCSB 350/TH350/NP203 +2/+3 Tuff Country lift

Offline nlauffer

  • Frequent Member
  • **
  • Posts: 274
Re: Review and pics: powered subwoofer
« Reply #8 on: November 19, 2013, 08:40:12 AM »
Actual bolt sizes are listed?  That would be awesome.  Don't mean to change the direction of this post.

Offline rich weyand

  • Senior Member
  • ****
  • Posts: 1391
Re: Review and pics: powered subwoofer
« Reply #9 on: November 19, 2013, 09:51:29 AM »
Actual bolt sizes are listed.  Such as, the crankshaft bearing cap bolt on a 350 is 7/16"-14 x 3-9/32".

You can still find the print hard copies around.  http://www.classictruck.com/product/1973_1978_GM_parts_manual_for_10_thru_35_series_trucks_LIT-73/1973-80_Trucks_Literature

I have the Detroit Iron CDs.  http://www.amazon.com/1973-1978-Chevrolet-Trucks-Illustrated-Number/dp/B00FA5QSY2
Rich

"Working Girl": 1978 K-10 RCSB 350/TH350/NP203 +2/+3 Tuff Country lift

Offline nlauffer

  • Frequent Member
  • **
  • Posts: 274
Re: Review and pics: powered subwoofer
« Reply #10 on: November 19, 2013, 11:01:38 AM »
I've never been to that site. Love it.  thanks.  Preference between the two?

Offline rich weyand

  • Senior Member
  • ****
  • Posts: 1391
Re: Review and pics: powered subwoofer
« Reply #11 on: November 19, 2013, 11:28:16 AM »
I don't have the hard copy book, only the CDs, so it's hard to compare.  I have the service manual in hard copy, and that's good because you can take it out into the garage with you more easily.  I think for the parts book, either works.  I did copy the CD files to my hard drive, so I don't need to put the CDs in all the time, and that's better.
Rich

"Working Girl": 1978 K-10 RCSB 350/TH350/NP203 +2/+3 Tuff Country lift

Offline roundhouse

  • Senior Member
  • ****
  • Posts: 1474
  • Newbie
Re: Review and pics: powered subwoofer
« Reply #12 on: October 09, 2014, 07:40:44 PM »
I know this is a year old thread,

but Rich, do you have some more pics of the seats?

and what are they out of?

Offline rich weyand

  • Senior Member
  • ****
  • Posts: 1391
Re: Review and pics: powered subwoofer
« Reply #13 on: October 09, 2014, 09:59:04 PM »
I know this is a year old thread,

but Rich, do you have some more pics of the seats?

and what are they out of?

Semi-custom, made to order.
http://forum.73-87chevytrucks.com/smforum/index.php?topic=27233.msg226558#msg226558
Rich

"Working Girl": 1978 K-10 RCSB 350/TH350/NP203 +2/+3 Tuff Country lift

Offline roundhouse

  • Senior Member
  • ****
  • Posts: 1474
  • Newbie
Re: Review and pics: powered subwoofer
« Reply #14 on: October 09, 2014, 10:43:13 PM »
Nice!


Thanks

I've seen a couple trucks where they used the second row seat from a late model Yukon