Post by: CruzinHigh on December 30, 2006, 03:23:00 pm
I screwed up and ordered the 3 3/4 ones for the tach and speedo though. I sent em back for the 5" instead.
Looks like this will be a really easy swap, just cutting out the back of the bezel a bit with a trusty air saw.
Good thing Scott has a housing I will be getting from him since I broke the tabs off my old one when removing! DOH!!

I will try to post up some pics when its done.
Post by: aort07 on January 02, 2007, 09:12:00 am

Those are 2 5/8" and 5" gauges. They fit really well with a little cutting and grinding.
Post by: CruzinHigh on January 02, 2007, 01:09:00 pm
I will be getting the 5's soon and will post up when I finish.
Post by: Blazin on January 03, 2007, 05:49:00 am
Post by: roundedline on January 03, 2007, 01:18:00 pm
73-87.com/7387garage/inte...cessed.htm
Chris Lucas
www.73-87chevytrucks.com
www.captkaoscustoms.com
Project Su
Jimmy 2WD Project
Post by: CruzinHigh on January 21, 2007, 10:48:00 am
I had a couple Autometer liquid filled pro comps laying around I aquired long ago that I figured would be perfect to find a home in this bezel. Since I have no A/C in my truck I didn't have a vent in the upper part of the bezel anyway.
Here's the back of the factory Bezel. I had to cut part of the back out to make my aluminum plate fit in there. If you don't have an air saw and you want to do this gauge install, I guess you could try a dremel, but the air saw is a PERFECT tool for this job.

Making the plate.....


The end fit of the plate ended up being so tight that the thing almost would have retained itself just sitting in the bezel. The awesome thing about this little spot in the bezel is that it accomdates (2) 2 5/8 gauges almost like the darn thing was made for it with the right plate. There is a 2nd ridge that reduces the size of the opening below the top of the bezel, perfect for the plate to butt up against.
I used a 2 part epoxy and plus when I put the backers on the gauges, 1 arm will hold behind the bezel.

I decided to use emory cloth to sand and then just clearcoated the aluminum, it ended up matching the brushed aluminum on the bezel almost perfect.
Here's the finished product.

By the way, this is a pretty easy job. With air tools and some patience, anybody could do it. You can even find little sheets of aluminum like this at Home Depot or Menards.
The other half of the job for the pressure gauge requires installation of the isolator, since you don't want to route fuel up to your dashboard.
I made another plate to cover the huge hole I had in the firewall from where the harness used to route through for the old ECM I won't need anymore. The Isolator uses anti-freeze for fluid inside the cab to match pressure seen on the engine side of the system.


Just this part of the gauge install has taken significantly longer then I had wanted, lots of little details I didn't think of when I just decided to "drop these in". I sill have to install the oil temp sender in the pan too. The primary gauges should be pretty easy with all electrical senders.
More to come! When I get the cluster housing I bought, I can start the install for the other 6 primary gauges.
Post by: Tire Burner on January 23, 2007, 08:47:00 am
Sorry about the Picture Quality. I need to get a New Digital Camera, but i've been spending all of my Money on my Truck. Can You Blame me? Edited by: Tire Burner at: 1/23/07 8:56 am
Post by: Tire Burner on January 24, 2007, 04:56:00 am
Post by: bigblock73 on January 24, 2007, 09:53:00 pm
Looks like you got it all figured out just fine though.

Jeff
'73 swb 2wd
73-87.com
Post by: bigblock73 on January 24, 2007, 09:57:00 pm
Keep the updates coming.
Jeff
'73 swb 2wd
73-87.com
Post by: CruzinHigh on January 26, 2007, 10:04:00 am
Quote:
you cab might look like a cockpit of an airplane when you are finished!

Yeah, its probably overkill for sure, but I figured what the heck while I've got the dash and harness all ripped apart for my re-wire project!
More to come, I am working on the engine harness this weekend.
Post by: shaved80 on January 28, 2007, 10:19:00 pm
Edited by: shaved80 at: 1/28/07 10:20 pmPost by: Tire Burner on January 29, 2007, 08:37:00 am
Post by: shaved80 on January 29, 2007, 01:59:00 pm
Post by: SUX2BU99 on March 13, 2007, 11:02:00 am
Post by: CruzinHigh on March 18, 2007, 10:49:00 am
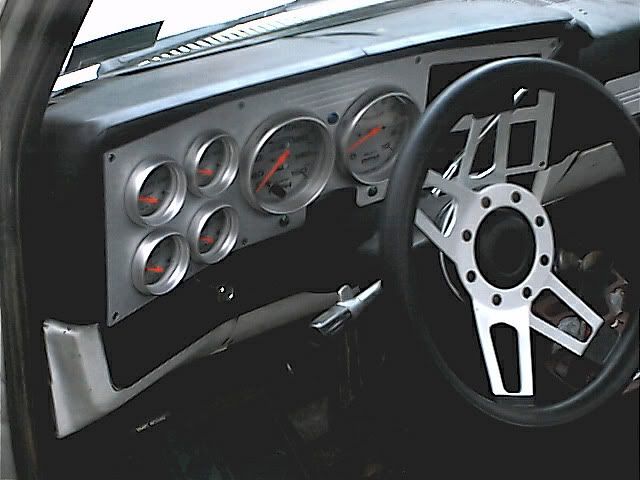
Here's the modification I made on the cluster housing to accept the new gauges. I cut the back out with an air saw.

I also decided to make a new inlay, out of sheet aluminum. I picked this piece of aluminum up at Menards for $15. The measuring and cutting took forever. Don't know if I would do this again, but smaller diameter of the gauge holes now ensure the aluminum goes all the way under the gauge bezels and it didn't before.
I used the old inlay for a template, that was just glued on (and coming off by now anyway)


This is the finished inlay. I know the circles look pretty jagged, but you can't tell once the gauges are installed.
I was able to cover up the spot for the transmission indicator too, since I am running a stick shift.
I made plates for the stereo area, and another with two toggle switches over on the spot by the light switch.
I will be sorting through the last details of the wiring today, and will epoxy the plates and inlay on since the clearcoat is dried on them by now.
More to come!
Post by: CruzinHigh on March 18, 2007, 10:53:00 am
Post by: CruzinHigh on March 25, 2007, 11:48:00 am
Here's a shot of all the wiring inside behind the dash. I had to create piles of power and grounds for the bulbs, plus power for the gauges themselves, and grounds. Then there's the sender wires of course too.

And here's the final product:

Thanks goes out to you guys that have done this already, and make available to the rest of us the info needed to approach the project. I had to switch gears a few times during the project, and there was always something that came up I had not planned for but such is life!
The one thing I would point out about this job if anybody wants to try it, is that you must remember about all those little indicator and idiot lights if you want to keep them. Heck, half of mine were long since non-functioning and I just don't care about an "e brake" indicator for instance anyway. I'd like to have kept the 4wd indicator, its kinda cool, but that was just adding even more work I wasn't interested in at this time. Lots of the indicators show up in the lower portion of the big 5" stock gauges, so if you put the 5" auto meters back in place, you will have to find a new home for those little lights. Indeed, this can prove a bit tricky!
Edited by: CruzinHigh at: 3/25/07 10:54 am
Post by: edcole on March 27, 2007, 09:53:00 am
Post by: roundedline on March 27, 2007, 01:19:00 pm
Chris Lucas
www.73-87chevytrucks.com
www.captkaoscustoms.com
Project Su
Jimmy 2WD Project
Post by: edcole on March 27, 2007, 06:02:00 pm
The truck I am building is a 1987 v10 that used to be an old wardens truck up here in Maine and spent most of its life on dirt roads so the body is in good shape for the year for a Maine truck. I am building mainly for a summertime truck to have fun with and tow my 24 foot travel trailer to a campground that is about 45 miles from my house a couple of times in the summertime.
Going to pick up the sm465 that has been freshened up with new bearings and a new paint job to match up to a nicely painted motor.
I just got the wiring diagram for the truck and the ecm does not look too bad to take out and I really like the looks of CruisinHighs with that harness out of there.
This is a great forum and thanks for the help that I have gotten so far from everyone.
Post by: CruzinHigh on April 14, 2007, 09:30:06 am
To remove that EST module, there's really nothing to it.
Here's an old photo of what I unearthed when going through my re-wire project.
(http://i4.photobucket.com/albums/y135/Highpsi/MysteryECM.jpg)
Just yank all the entire harness basically. I simply ran a new wire from my MSD to the single feed for my points distributor.
If you're running an HEI setup and no MSD, I guess that will be a bit different. Not sure exactly how you'd wire that up, but I had mine going that way before with a conglomeration of crazy wiring like I said from the botch job somebody had done on the truck before I bought it. I suspect it's really simple but I never really dug back through the old wires and dissected it.
If you want any other tips, we should start a new post. I will check in to see how you're coming. Good luck!
Post by: 79SHORTWIDE on October 28, 2007, 01:06:12 am