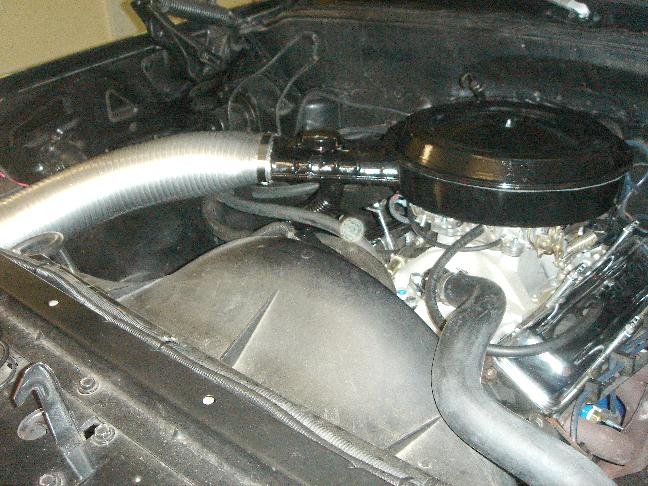
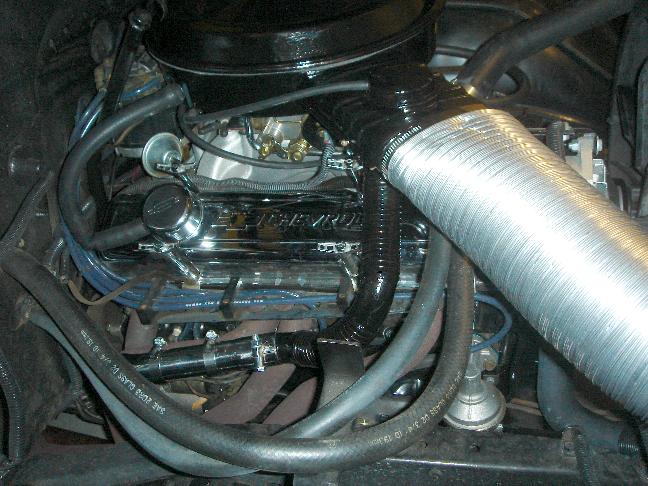
In January 2012, I put a new GM Performance 350 in my '78 when the original started blowing green water out the tailpipes. I kept the Edelbrock 1406 carb, but put an Edelbrock 2601 air-gap intake manifold under it. The air-gap manifold lifts the carb and fuel runners up off the lifter box cover to keep the engine oil from overheating the carb. The problem is it also keeps the engine oil from heating the carb to operating temperature.
Somewhere along the line the original induction system, with the thermostatic air cleaner and heat riser and all that, was removed and they put one of those "two chrome pie plates" deals on it. This solves the problem of what do you use for a heat stove and heat riser when you put headers on the engine. But, it gives you no carb heat.
"Carb heat" is what the flyboys call it. They put a wrap around a header, called a carb heat muff, and run a duct to the air intake. This has a pull cable to the interior so the pilot can select between ambient air and heated air from the carb heat muff. They also put a carb temperature gauge on the airplane.
The issue is that gasoline, when it vaporizes, takes on the heat of vaporization from its surroundings, in this case the carburetor. In the right weather conditions, say 45-50 degrees and high humidity, the carb can condense ice and freeze up. I didn't have those problems, or haven't yet, but I had poor performance on the cruise circuit and bad gas mileage -- only 7.5 mpg on a 350! -- until the carb heated up, which could take a long time, or not at all depending on ambient temperature.
OK, so I fixed it, and boy does it make a difference. I went from 7.5 mpg to 9 mpg with no other changes.
I started out by getting an air cleaner body, lid, heat riser tube, and front bulkhead fitting from the local junkyard, which has several late 70s c/ks in stock. I cleaned them all up with EvapoRust and Aircraft Paint Stripper, straightened them out a bit and repaired some things with JBWeld, then repainted with Rustoleum Rusty Metal Primer and Gloss Black straight out of the can. Nothing fancy, it's a truck and a DD, though I have put a chrome air cleaner lid on it since these pics, and that looks spiffy. I also got a new PCV breather line, cap, and filter, and a new air cleaner thermostatic vacuum switch. The existing air door and motor worked fine. I also needed a 3/4" air cleaner spacer to fit the stock air cleaner body over the Edelbrock, due to a conflict at the Edelbrock's fuel entry. I cemented it to the air cleaner body with 3M Weatherstrip Adhesive so I don't have to mess with it all the time.
Installation of all the above was straightforward. For the cold air induction line from the air cleaner to the front bulkhead fitting, I used an aluminum dryer vent tube. For the heat riser, I used a Gibson 500415 Polished Stainless Steel Exhaust Tip. This is a "turndown" style. I had a local machine shop mill off the turndown part to be flush with the bottom of the straight part and mill three 1/2" wide, 1/2" deep slots across the bottom side of it. They charged me $20 for the machining. This I band-clamped to one of the header pipes. The Hooker headers have one pipe that heads back before it turns down and it was perfect for that.
The heat riser was an issue. I tried a "flexible stainless steel exhaust pipe repair kit" in a 1-1/2" diameter, but it would not bend tight enough to get out from under the air cleaner snorkel without hitting the valve cover. What I ended up doing is cutting the original heat riser pipe up into its component elbows, and using them with sections of the flexible between them to build up what I needed. I assembled the whole thing with JBWeld, primed, and painted.
So this is what I got:


As I say, driveability is much improved. It takes about 30 seconds at idle for the header to heat enough to start warming the inlet air drawn through the heat riser, which is much faster than using a stock manifold because the header tubes are so thin and they heat up rapidly. It takes about five minutes at idle for the air door to open. It does not just flip open, but is proportional. Very nice. And when you get on it hard, the vacuum motor loses vacuum and the air door opens the four-inch pipe from the bulkhead whether the air cleaner is warm or not.
Before I had the worst of both worlds: hot underhood air when the engine and weather are hot, and cold underhood air when the engine or weather are cold. Now the inlet air temp is regulated -- I get hot air off the headers when the air cleaner is too cold, and cold air from in front of the radiator bulkhead when the air cleaner is too hot -- which means all the carb tuning I did with a warm engine will actually be spot on whenever I drive, hot, cold or in between.
I have since re-cammed the engine to a cam with less overlap to deliver more torque in the bottom (now about 300 hp and 380 lbft), and I am getting about 10 mpg running around town and on my hilly country roads.
So, a couple things for you all. One, do not use the air-gap manifold unless you have a thermostatic air cleaner setup. The carb will run so cold under most conditions that you will get terrible carburetion, poor performance, and bad gas mileage.
Second, if you want to put headers on your engine, and want to keep the thermostatic air cleaner setup, it is not hard to mod the existing heat riser pipe and connect it up with a turn-down style exhaust tip clamped to a header pipe with just a little machine shop work on the exhaust tip.

 1
1
