Author Topic: My '77 K-30/V3500 Monster Truck Build  (Read 311539 times)

Offline illinoisk30

  • Registered Users
  • *
  • Posts: 225
  • Newbie
Re: My '77 K-30 Monster Truck Build
« Reply #165 on: October 12, 2014, 08:51:29 pm »
Looks good Engineer, I firmly believe in mocking things up and making patterns as well. I do a lot of fabricating where I work and it is always better to measure twice and cut once then to cut welds and start over again. I remember those trucks from the 80's  and 90's with the bright colors and wild paint jobs. I still have a stacks of those magazines in my closet. Really enjoying this build. Can't wait to see the final product.
1977 Chevy K10 LWB Supercharged 406 TH350
1977 Chevy K30 DRW 400 TH400
1978 GMC K35 SRW 454 TH400
1979 GMC K35 SRW 400 TH400
1980 Chevy K30 SRW 350 SM465

Offline Dan75k20

  • Frequent Member
  • **
  • Posts: 269
  • Newbie
Re: My '77 K-30 Monster Truck Build
« Reply #166 on: October 21, 2014, 07:58:14 pm »
Awesome project engineer

Offline 87V20Kansan

  • Newbie
  • Posts: 79
Re: My '77 K-30 Monster Truck Build
« Reply #167 on: October 25, 2014, 12:08:57 pm »
Love it!
Cecil: 1987 V20, TBI 350, TH400, 4:10's, 7" lift, 37" H1 beadlocked runflats. Cummins swap someday.

Offline Engineer

  • Senior Member
  • ****
  • Posts: 1402
Re: My '77 K-30 Monster Truck Build
« Reply #168 on: November 17, 2014, 08:57:44 pm »
So here is what we had after my last update.


I alluded to a couple of major changes with the frame build in a prior post. Well I was able to do most of the changes, but the weather took a turn for the worse around here and I need the main floor space in my shop to shelter my daily driver from the plunging temperatures.

The frame isn't quite complete. There is one major step, and several little ones. However, I am seeing a light at the end of the tunnel.


Looking back over this thread most would conclude that I can't seem to make up my mind. Well, I can't form an argument against that notion. Hahaha!

After some more pencil, and calculator time I decided my "subframe" would be adequately stout enough to be the primary frame. I will not be using the factory frame in this build. It isn't necessary, it will add weight needlessly, and using it would prohibit the one big change that I added to make this a more 80's period correct build.

Since I no longer have the factory frame to bolt the body to I had to build new body mounts. Again, pencil, tape measure, calculator, and geometric tools were called into service.

This is the frame as it sets right now:


And here is how I got this far......

I started by finding my centers, stretching a plumb line, and triangulating the front cab mounts.


These photos show the front cab mounts up close:


Since fancy laser metal cutting didn't come until after the era of classic monster trucks you don't see fancy scroll work or anything of that sort. However, it didn't stop aspiring metalsmiths from adding a bit of creativity. As can be seen all over this build I have notched my corners to give everything an octagon theme. The front cab mount is one such example.


The 3"x3"x2.75" square block sitting on the cab mount will space the cab off the frame a full 3". This should allow maximum body height without an annoying gap between the bottom of the cab pinch weld, and the top of the frame.


This picture shows the front cab mounts in place with the rear cab mounts setting on the 4" channel crossmember I added to make the rear cab support structure:


The following two pictures show the completed cab mounts, and the trusswork that will replace the support that was to be in part provided by using the factory frame:


Also visible in the second picture is the front bed mounts. More on that later.


This picture shows that the two center crossmembers that were flat originally were raised 4" to facilitate the install of an SCS, or similar type transfer case. The jury is still out as to what brand of case I'll end up with, but now I know the intermediate driveshaft will be in position for good u-joint angle.

The object in front of the transfer case is the rear mount for the SM465 2wd transmission. This should be in perfect factory position as it relates to the body, and floor board.


This photo, looking forward, is the transmission mount:


Front body, or radiator support mounting will be tasked after the body is set over onto the monster frame. I'll be using these. They were sourced from a C30 circa 1985. I'll have to make brackets to mount these to the frame. Ideally, I'll have the correct radiator support mounts with correct front bumper location.


Revisiting this photo for a moment the two cradle mounts are the front bed mounts.


I plan on making the bed into a tilt bed as was all the rage in the mid to late 1980s. the 4" angle in the lower left of the picture with the 4 holes drilled in it will be the lower mount for the lift cylinder.

The bed will sit on a cradle that the lift cylinder mounts to, and pivots off of the mount on the rear of the frame. In no way will I have to modify the bed itself. It will retain all of its factory integrity.

This is the rear mount for the bed where the bed will pivot so it will tilt:


Also, there was gobs, and gobs of fabricating for other things as my mind went wild.

This is the mount for the suspension's bump stops:


Welded into place:


The bumpstop I am using:


Mounted the fuel filter/water separator:


These blocks are to mount the air tank to:


I have an air tank from a wrecked 18-wheeler that I am using as a storage tank for air horns, a locomotive bell, and possibly the lift cylinder for the bed.


The little tab with the hole in it is for mounting mufflers/exhaust as the project nears completion. Planning ahead for much of this stuff so I don't have to hack up the paint job later on.


Back to this image again shows the engine mounts just laying on the crossmember over the front axle. I had hoped that I would have the engine mounts done for this update but it just hasn't happend. I am hopeful that I can get to that over Thanksgiving. The engine, and transmission will set entirely above the frame so that it will be positioned correctly in the engine bay. I am wanting the engine fan to be centered in the fan shroud just as if the truck was built using the factory frame.


I still need to add small touches like brake line brackets, and plumbing for the axle vent tubes, and so forth, and so on.....but....

That about does it for this update. I have more I can add, but no need to make this post into a Shakespeare novel.
« Last Edit: October 25, 2015, 07:37:14 pm by Engineer »
2002 Chevy 2500HD 4x4 8.1/ZF6sp RC/LB
2001 Chevy 2500HD 4x4 6.0/4L85E EC/SB
1997 Chevy Blazer 4x4
1994 Chevy K-2500 4x4 C6P 5.7/4L80E
1979 Chevy K-30 4x4 4sp 4.10
1977 Chevy K-30 4x4 4sp 4.10 454

Dad of an Eagle Scout, and a Life Scout

Offline LTZ C20

  • Senior Member
  • ****
  • Posts: 3795
  • "I'm here for a good time" -George Strait
Re: My '77 K-30 Monster Truck Build
« Reply #169 on: November 18, 2014, 12:16:00 am »
Shakespeare it is not, idiots guide to custom fabrication for the true truck guy is more like it.
LTZ Cheyenne C20

Offline illinoisk30

  • Registered Users
  • *
  • Posts: 225
  • Newbie
Re: My '77 K-30 Monster Truck Build
« Reply #170 on: November 19, 2014, 08:36:01 pm »
Looks Great Engineer. I love all the fab work and stick welding. Makes me want to do something.
1977 Chevy K10 LWB Supercharged 406 TH350
1977 Chevy K30 DRW 400 TH400
1978 GMC K35 SRW 454 TH400
1979 GMC K35 SRW 400 TH400
1980 Chevy K30 SRW 350 SM465

Offline Engineer

  • Senior Member
  • ****
  • Posts: 1402
Re: My '77 K-30 Monster Truck Build
« Reply #171 on: December 13, 2014, 02:12:25 pm »
Well, I was able to find time to sit down and post another update on the ol' battleaxe. It seemed like the last post was approaching the length of a Shakepeare classic, hopefully this one wont eclipse the page count of War and Peace. I guess I should try to update this thread on a weekly basis so that when I do post it will be less to read every time. That whole pastor's sermon goes on and on until you lose your audience sort of thing......

So here it is.

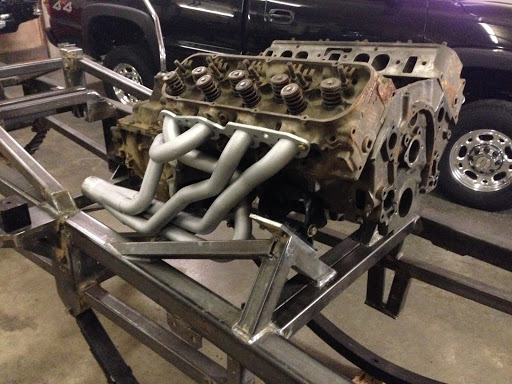
I finally can call the frame complete (sort of):


I was able to construct the engine mounts in a way I believe they will work the best.


The engine will sit slightly low in the frame to start. I will most likely have to space the engine mount upward to get the engine in the factory position once the body is on. I did it this way because I feel it would be easier to space the mounts upward rather than to try to build new mounts that would drop the engine. These are the solid engine mounts that I had built for the sled puller configuration.

I also built the engine mounts to accomodate the return to factory rubber insulated frame mounts should I ever elect to do so.


In these pictures are visible the framework I built to mount the clutch linkage:


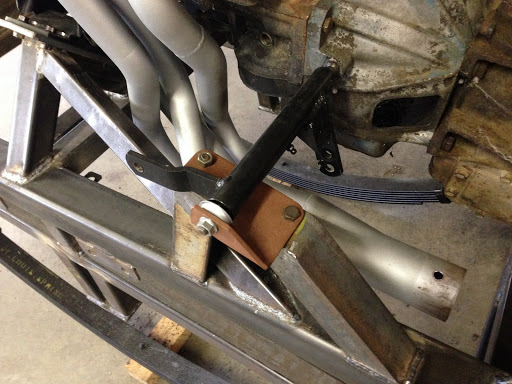
After I set the engine in the frame I measured, measured, and measured some more. I determined the engine needed to be moved forward one inch to avoid interfering with the cab's firewall. So, this is the modification to the transmission mount that was the result of moving the enigne:


My transmission mount was built with the intention of being able to raise or lower the rear of the transmission, or changing it all together to facilitate the install of a TH-400, or 4L80E at some point should I ever (doubtfully) decide to go that route.

I stated that I like to mock everything up mutiple times before the final build. I believe it was our good friend "illinoisk30" who said "measure twice, cut once" my philosophy is "I've cut it three times, and it is still too short". (hahaha!)

Seriously, I made a likeness of a puller transfer case that replicates one that I intend to use in order to check my first driveshaft angle. Looking good. So good that I didn't bother to concern myself with calculating the angles, which in retrospect I should have done for future reference.


In the next photograph the wood block approximates where the top of the axle will be in relation to the springs.


The awesome thing about the 2.5~5-ton Rockwell military axles is that their double reduction gearing moves the driveshaft connection point way up above the axleshaft centerline.

About 10":


I wanted to see how much I could get away with before I had any driveline binding issues. So, I dropped the driveshaft all the way down to see how much I could drop the transfer case before the angle became too severe.


I could probably drop the transfer case 4" and get away with it. However, I would want to avoid introducing any driveline harmonics unecessarily so I will look at keeping it in the 2"~3" drop range but only if it is required to lessen the angles on the driveshafts to the axles, and only if they are severe. The transfer case will be centered so as to use identical 1610 series 5-ton driveshafts front, and rear.

Here is the rub to dropping the transfer case- I would like to avoid dropping the transfer case if I do not have to. The transfer case input will be parallel with the horizontal axis of the frame. The engine and transmission are located with the GM designed 6° nose up from horizontal. To keep the driveshafts to the axles equal I cannot rotate the transfer case upward the way GM did with the rear axle to match the engine. In order to prevent introducing a vibration the effort is to keep the u-joints in similar phase. The high (or low) angles are not so much a problem as is keeping the u-joint angles similar so that one u-joint's phase change cancells out the opposite's phase change.


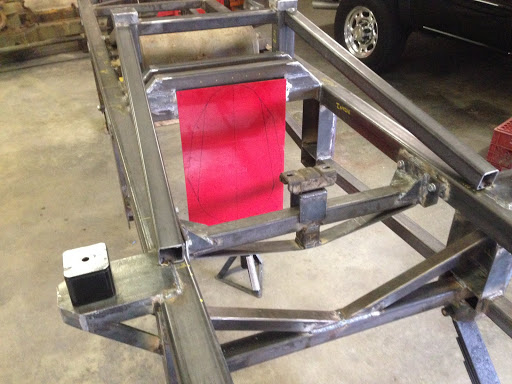
In the process of doing this build I have added tabs and other bracketry for mounting brake lines, vent lines, fuel lines, and so forth. I'll still need to add brackets to hold a fuel cell over the rear axle. The hydraulic steering will need brackets for the steering valve, hoses, reservoir, and a steering fluid cooler.

Bracket for the brake line to brake hose bulkhead fitting:


I'm reusing much of the brake plumbing that I purchased for the puller build.

A little bracket for the axle vent tubes:


I bought these cool looking coiled hoses to vent the axles:


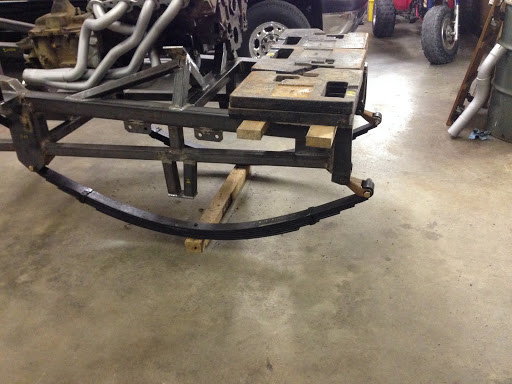
I'm going to have to make some minor tweaks to my leaf springs. When I had these built I sort of figured that would be the case. I am somewhat still in the school of hard knocks as far as leaf spring design goes. Spring rate, deflection, etc.

I built my frame around a 60" eye center span leaf spring based on sizes, specifications, and components of exisiting Chevy truck springs. Knowing that the length would grow as I added weight I had the spring built to a 58.75" span. After adding the weight of the engine, and transmission to the bare frame I had already exceeded my target of 60". I built the mount for the shackle to sit 90° to the spring eyes with the full weight of the truck on it sitting on level ground.

This being a "compression shackle" design (truck's weight pushing down on the shackle) when the spring cycles the shackle in its normal arc past my 90° target it will effectively lower the spring rate of the spring. This gives a better overall ride, but allows the input forces to the spring to deflect the spring easier. By starting the shackle with an angle of less than 90° you raise the effective spring rate of the spring prior to its passing the center (90°) point. This can result in a choppy, or harsh ride if the spring isn't built with a soft rate in the begining.

Thinking of it this way, if the shackle is leaning inward toward the spring as the spring is pushed upward by road shock, the shackle will be swinging downward in its natural arc as the force of the bump is trying lift the spring. After the shackle passes the mid point, its arc will then allow it to travel in the natural direction of the input force. (The above ONLY applies to a compression shackle. -Think front of our 4x4 trucks. It it the exact opposite theory applied when the leaf spring is mounted with a tension shackle design. -This is what is found on the rear of our trucks)

As I said, I had exceeded my target eye span with just the weight of the engine, and transmission. To similate the cab, front end, hood, steering valve, engine accessories, bumper, frame addition, etc. I added (and intentionally overloaded) the front of the frame (you know, that mock up of things before final assembly  ;D). This is the springs with 600# of added weight:


In this picture, ideally, I want an imaginary line drawn through the centers of the shackle bolts to be straight up and down:


After finding out that I would need to tweak the springs I once again called the guys up at StLouis Spring. Man, these guys are aces to deal with. As anyone may have noticed all through this thread I have intentionally left out names of products I have used. The reason for this is because nobody is paying my to use their camshaft, or shock absorbers. However, I feel mentioning StLouis Spring is warranted because these guys have been so helpful with answering stupid questions over the phone, and only seem eager to help me with my latest needs.

In fixing my springs I need to shorten the main leaf slightly. I am looking at a 57" eye center. If this can be accomplised by bending more arch into the spring then that will be super. The critical factor is that about all StL Spring can phyisically bend into a leaf spring is roughly 14~15" of arch measured from an imaginary line drawn through the eyes to the top of the main leaf. So, if the spring can't be drawn up to 57" naturally then the main leaf will need to be shortened ever so slightly. The guys at StL Spring have already expressed a desire to make the re-arch solution work before shortening the main leaf, so I am optimistic that the main leaf can stay as is. Also, I'll be increasing the static spring rate by about 33%. I am going to have them add two more leaves to the pack. Again, this build is about height, not an active 4x4 off road suspension.


Recently my oldest son, and I had a conversation as to why I placed my shackle toward the front on the front spring as opposed to the tradtional rear of the front spring. If you look at my design it is a "poor man's 4-link":


As mentioned earlier, the springs will want to travel in a natural direction away from the end that is anchored to the frame in the direction of the shackle. By mounting the springs inboard, and having them travel outwards the axle will migrate in the direction that the swing of the torque rods (some people call these traction bars) take as they cycle. The location, and height of the center mount on my frame is no accident. It serves two purposes. 1) To mount the transfer case. 2) By placing the mounted end of the torque bars at the point they appear in my drawing, the horizontal forward movement of the axle end of the torque bar as it swings through its arc will be a similar movement to the horizontal forward movement of the center of the leaf spring. (which would theorhetically be 1/2 of the shackle's movement)

"Back in the day", and maybe still today, even with the interwebs, some guys would mount their spring shackle on the rear of the front spring, and then would have to build into the traction bar a hydraulic cylinder with a dampening type of plumbing between the two chambers of the cylinder to allow for the rearward travel of the front axle as it cycled. This, to me, seems counter logical at the very best. Other than the slight dampening effect of the hydraulic cylinder, minus any air in the system, it is useless. With a setup like that your leaf springs are doing more than just holding up your truck. They have to counteract the power, and braking torque, and that was only made worse by the fact that almost every truck used/uses blocks between the spring, and axle for height. The block translated into leverage against the spring.......and the more a spring is worked the sooner it reaches its failure threshold. And yes, almost every major monster truck did this, and got away with it......even the potentate Bigfoot.

(Caveat emptor- or why you want your springs like our square bodies have them from the factory) One MAJOR advantage to having the shackle on the rear of the front spring is that you don't have the natural tendancy of the spring to wander. The extra pivot point lets the springs yaw laterally, something you dont get with the front of the front spring being anchored on the front of the truck. Ford solved this with their 99~04 Super Duty by adding a track bar to their leaf spring fronts........Just food for thought, and not really applicable to an 80's monster truck but just thought I would throw it in here.


A short time ago my son texted me with some excellent news. Earlier in this thread I mentioned working out a deal for a triple/double roll bar (pictured in the yellow truck). I had given up the idea of getting it because the deal became too much work. Well I think the good Lord loves classic Chevy monster trucks. With out fail every thing that I have wanted for this build, tires, axles, bed, tailgate, and other body parts, have eventually found me. The roll bar swiched hands a couple of times and finally found its way to my oldest son. Now it is here:


You can't tell by the pictures, but one of its previous owners welded all of the bars, and tubes together. and they used a wire feed welder set on "no penetrate, extra cold". So the welds all stick up like dirt dauber nests.....ugh. Not to worry, I'll give it a good fixin' before it gets put into my '77.  ;)


And I just realized I never posted a pic of all of my tires:


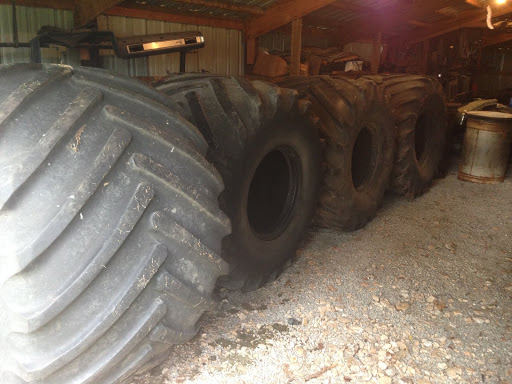
As mentioned, I now have all 4 tires. I still only have 3 wheels, but I have a 4th wheel located for $150.00. Hope to go get that sometime after Christmas.

Well, maybe this post is long enough to score me a Nobel prize in literature...... Leo Tolstoy would be proud.

« Last Edit: October 25, 2015, 07:14:46 pm by Engineer »
2002 Chevy 2500HD 4x4 8.1/ZF6sp RC/LB
2001 Chevy 2500HD 4x4 6.0/4L85E EC/SB
1997 Chevy Blazer 4x4
1994 Chevy K-2500 4x4 C6P 5.7/4L80E
1979 Chevy K-30 4x4 4sp 4.10
1977 Chevy K-30 4x4 4sp 4.10 454

Dad of an Eagle Scout, and a Life Scout

Offline outlaw70nova

  • Newbie
  • Posts: 61
  • Newbie
Re: My '77 K-30 Monster Truck Build
« Reply #172 on: December 15, 2014, 09:22:13 am »
I can't wait to see the finished product!

Offline illinoisk30

  • Registered Users
  • *
  • Posts: 225
  • Newbie
Re: My '77 K-30 Monster Truck Build
« Reply #173 on: December 23, 2014, 09:12:25 pm »
Very nice Engineer, excellent craftsmanship. I can hardly wait to see the sheet metal put on.
1977 Chevy K10 LWB Supercharged 406 TH350
1977 Chevy K30 DRW 400 TH400
1978 GMC K35 SRW 454 TH400
1979 GMC K35 SRW 400 TH400
1980 Chevy K30 SRW 350 SM465

Offline Engineer

  • Senior Member
  • ****
  • Posts: 1402
Re: My '77 K-30 Monster Truck Build
« Reply #174 on: December 27, 2014, 10:14:29 pm »
I just realized I have a couple more pictures that my wife took of Little Bearfoot that didn't make it into the first post on the subject.

Here is a decent shot of it sitting on its hauler. Not many pictures of the monsters ever made it into circulation "behind the scenes". Here is one such example. Obviously the 66" GoodYears would have been taken off prior to any over the road moves.


« Last Edit: October 25, 2015, 08:23:56 pm by Engineer »
2002 Chevy 2500HD 4x4 8.1/ZF6sp RC/LB
2001 Chevy 2500HD 4x4 6.0/4L85E EC/SB
1997 Chevy Blazer 4x4
1994 Chevy K-2500 4x4 C6P 5.7/4L80E
1979 Chevy K-30 4x4 4sp 4.10
1977 Chevy K-30 4x4 4sp 4.10 454

Dad of an Eagle Scout, and a Life Scout

Offline Engineer

  • Senior Member
  • ****
  • Posts: 1402
Re: My '77 K-30 Monster Truck Build
« Reply #175 on: January 05, 2015, 07:38:16 pm »
As alluded to in a prior post I took my springs in for a rework.


I had the springs built before I built the frame. I felt it best to do it this way and then build around the springs. I don't know if this was the cheapest, (no) or the best (hmmm)..... But anyhow, I feel like I ended up right where I want to be, and that is the important part.


Originally I had the springs built with a 58.75" eye center. I proposed that by building them short I would hit my target of 60" with a load on them. I missed by about 3 1/2". During the rework I had the eye center set at 57". The other 1/2" I intend to make up by adding 2 leaves, or about 33% more spring rate.

By building 8 leaf packs I can remove the shortest leaf very easily if this new setup proves to have too much spring rate. I'll know more after the truck is finished with the full weight on it. Again, my target is to have the shackle at 90° to the spring eyes.

As can be seen in this photo the shackle is about 38° negative to the eyes with only the empty frame weight on it.


I intended to set my engine and suitcase weights on the frame to get an idea of where I am physically with the springs, but I pulled a muscle in my stomach moving the springs around. So, I'll give the 'ol gut a few days to heal. Still plenty of things to do in the mean time.

By weighing it down I'll be able to get a better idea if I'll hit my target of 60". If I am short, and I am hoping I am, I'll leave it as is because I'll need to plan for settling of the springs as they take a set after being cycled a few times. I could even live with a final measurement of 60 1/2", but not this:


The guys at StLouis Spring were really good to me on this rework. Initially they built my springs with an arch of 15" as measured from the eye centers to the top of the main leaf. Their normal limit is 14". On this rework it was going to be less hassle to draw the main leaf to get it to the 57" eye center than it was to shorten it and roll the eyes a second time. This gave me a 16" free arch which is great for me, but a problem for them as their heat treat oven wont let them place springs in it that are that tall without a lot of hassle.

I am still going to have to use blocks on top of the axles to get the necessary height to clear the GoodYear Terras but by squeezing in the extra inch into the springs, and the added spring rate I can keep the Legos to a minimum. As a saftey factor I intend to build a 6" tall block onto the top of the axle for the spring to seat on, and locate the torque rod mounts at the bottom of the axle. The 6" lift block will be welded onto the axle housing so as to prevent it from ever rolling out from under the spring and causing a loss of control. My plans are to build the top of the block out of 1" thick material and build it wide enough that I can drill and tap holes to accept bolts, and a plate to clamp the spring and not use u-bolts that wrap under the axle. I have never been a fan of u-bolts even though they are the industry standard. They are more prone to stretch the longer they are, and that can cause them to loosen enough if not retorqued to cause the suspension to fail.

Hopefully, since the springs, and frame are complete I can now focus on the axles. They wont need much. Just stripped, add the spring seats and torque rod mounts, and painted. I have new knuckle boots for the front, but will probably just reuse the seals for now.

A couple of parting views:


Now, much taller:  :)

« Last Edit: October 25, 2015, 06:42:39 pm by Engineer »
2002 Chevy 2500HD 4x4 8.1/ZF6sp RC/LB
2001 Chevy 2500HD 4x4 6.0/4L85E EC/SB
1997 Chevy Blazer 4x4
1994 Chevy K-2500 4x4 C6P 5.7/4L80E
1979 Chevy K-30 4x4 4sp 4.10
1977 Chevy K-30 4x4 4sp 4.10 454

Dad of an Eagle Scout, and a Life Scout

Offline FlatBlack77

  • Junior Member
  • ***
  • Posts: 894
  • Cheap Fast Reliable - Pick 2
Re: My '77 K-30 Monster Truck Build
« Reply #176 on: January 05, 2015, 10:48:35 pm »
coming along nicely! i love that roll bar 8)

"no penetrate, extra cold" made me laugh
"When you are a hammer, everything looks like a nail"
'77 C/10 - 350/350 mild street motor

Offline Engineer

  • Senior Member
  • ****
  • Posts: 1402
Re: My '77 K-30 Monster Truck Build
« Reply #177 on: January 18, 2015, 06:44:02 pm »
Not a whole lot to update about today. I was able to load the frame to see how the reworked springs would react. I had hoped to get the rest of my small parts fabricated but that didn't happen.

As stated earlier I look to build a 6" lift block that will act as a spring perch on the axle. I intended to not weld to these very low mileage axle housings but I digressed. Odds are that no one will ever reuse these axles in an M54 or similar truck, and if they do, cutting off anything I weld on can be accomplished without much trouble. So welding the lift block/spring perch, and the torque bar mounts to the axle housing will commence as soon as I have those parts fabricated. The hold up on that was the reason for this latest update. I wanted to get the weight on my springs to see how much block I would need to keep the lower body line of my truck a minimum of 6" above the top of the tires.

Looking at this truck's photo gives the reader an idea of where I plan to build the ride height to. As stated earlier I'm not in anyway considering cutting the fenders for tire clearance:


The above photo is one I took sometime around 1986, or 1987. My perspective is slightly uphill otherwise this picture would show that this truck has a similar ride height to my plans. Like the Bearfoot truck(s), I loved that truck too. It just needs a few 6" off road lights on the roll bar to be complete.  8) That truck had a Lycoming helicopter engine in it. Other than the light (fire) show I never could figure out the logic behind not using a 454 or similar iron. Still a cool rig just the same.

Back to my monster, I plan to build the axle block/spring seat so as the leaf spring will be clamped directly to it by using 3/4" bolts bolted through a plate on top of the spring, and into the top of the block/spring perch. I'm looking at eliminating the typical U-bolts for two reasons. 1) U-bolts tend to loosen and stretch more than a typical grade 8 bolt. 2) It will give a cleaner look.

Also waiting is a need to weld the mounts for my steering cylinders. I can't start that phase until I order my steering cylinders. I recently had a failure of my brand new looking, albeit 20 year old air compressor. So, not having an air compressor has severely cramped the progress of this build. A plain vanilla 60 gallon, 3.5hp air compressor is in the $500.00 range. So that will set this build back somewhat. Can't run a sandblaster, or HVLP paint gun without air.  ;D

In any event. I placed my mock-up engine, and the SM465 transmission I plan to use back in the frame. Then I went about simulating the clutch, crankshaft, other missing engine parts, transfer case, and the weight of the body, bumper, radiator, and other incidentals by adding 12 IH 5288 suitcase weights to the front of the frame. (about 1150# total for the suit case weights)


In the second picture one can see I am really close to my target of 90° with the spring shackle. The actual eye center is 59.5". My design is for a 60" eye center. After allowing for some settling I should have just what the doctor ordered.


I am very pleased with how the reworked springs turned out.
« Last Edit: October 25, 2015, 06:31:19 pm by Engineer »
2002 Chevy 2500HD 4x4 8.1/ZF6sp RC/LB
2001 Chevy 2500HD 4x4 6.0/4L85E EC/SB
1997 Chevy Blazer 4x4
1994 Chevy K-2500 4x4 C6P 5.7/4L80E
1979 Chevy K-30 4x4 4sp 4.10
1977 Chevy K-30 4x4 4sp 4.10 454

Dad of an Eagle Scout, and a Life Scout

Offline Engineer

  • Senior Member
  • ****
  • Posts: 1402
Re: My '77 K-30 Monster Truck Build
« Reply #178 on: January 25, 2015, 06:48:42 pm »
Well here is what I was able to accomplish this weekend. In the following picture is the parts I'll use to make the axle spring seats/lift blocks.


The part to the upper left is the plate that the bolts will clamp on top of the springs. One side is longer than the other so as to affix the lower shock mount to. The parts to its right will be the top of the block itself. The small 1/4" holes will be drilled and tapped for the bolts to clamp the spring to. The square tubing will be what the top plate is welded to in order to gain the 6" lift.

The 1/4"x5"x6" plates will then box in the whole setup and securely weld it to the axle housing. Again, I am eliminating u-bolts from this build.

The triangle plates are the torque bar mounts. They will be welded down low on the axle housing to help control movement of the axle. I have 4 sets of these for each spring location on the axles.


In this picture are the components for the torque rods. The ball socket will be on the frame end. The rubber bushing will be pressed into tubing that is cut and welded to the axle end of the torque rods. It will then be bolted in between the triangle shaped brackets in the top photo. Connecting the two pivots, and making up the body of the torque rods, will be lengths of 11ga. 1 1/2" x 2 1/2" square tubing.

I still need to drill and tap the plate that welds to the axle. If I can get that done pretty quickly then I will be able to weld them first to the rear axle. When I get that done I'll post pics and this part of it will make more sense. If you guys are having a hard time envisioning how I am going about this phase don't worry, I'm not the best as describing my thoughts.

The front axle will be after the rear axle. The rear is ready to use as-is. I need to disassemble the front axle to rotate the differential, and install the knuckle boots. Also in waiting is for me to order the hydraulic steering cylinders. I need those so I can build the mounts that will anchor the cylinders in the center of the axle housing. I want to be able to do that all at one time. And of course I'll have to paint the front axle prior to reassembly to avoid painting the knuckle boots.
« Last Edit: August 05, 2015, 07:12:50 pm by Engineer »
2002 Chevy 2500HD 4x4 8.1/ZF6sp RC/LB
2001 Chevy 2500HD 4x4 6.0/4L85E EC/SB
1997 Chevy Blazer 4x4
1994 Chevy K-2500 4x4 C6P 5.7/4L80E
1979 Chevy K-30 4x4 4sp 4.10
1977 Chevy K-30 4x4 4sp 4.10 454

Dad of an Eagle Scout, and a Life Scout

Offline illinoisk30

  • Registered Users
  • *
  • Posts: 225
  • Newbie
Re: My '77 K-30 Monster Truck Build
« Reply #179 on: January 25, 2015, 08:02:46 pm »
Sounds good Engineer. Looking forward to seeing those axles installed.


Sent from my iPhone using Tapatalk
1977 Chevy K10 LWB Supercharged 406 TH350
1977 Chevy K30 DRW 400 TH400
1978 GMC K35 SRW 454 TH400
1979 GMC K35 SRW 400 TH400
1980 Chevy K30 SRW 350 SM465